Deferred Lighting with Pixi.js
Introduction
You can find the pixi-lights plugin on github.
Some of you may be aware that I recently did an experiment with Pixi.js to see if I could write efficient normal-mapped lighting. Well I had no idea where to start, how to do lighting, or what the best way to do it would be. So, I did a bunch of research on how drawing normal-mapped lighting works, and came up with a way to get it drawing correctly using this tutorial (thanks Matt DesLauriers):
https://github.com/mattdesl/lwjgl-basics/wiki/ShaderLesson6#IlluminationModel
It was pretty dirty. Basically I wrote a filter that did N-lighting that was forward-rendered. For those who don’t know, the normal renderer in Pixi.js is a forward-renderer. That means it iterates “forward” through the scene list and draws each object entirely as it goes along. Anyway, the idea behind the filter I wrote was that by adding this filter to a container it would add lighting to that container. Problem was that since it was forward rendered each light had to be shaded for each object in the container. In the few projects I wanted to use the effect in, it wasn’t performant enough for the amount of lights I wanted to have. So I started looking for a better way.
Deferred Rendering
Eventually I found the concept of deferred rendering. We will talk more about how it works, but the goal of deferred
rendering is to defer the lighting until the scene is done drawing. With forward-rendered lighting you draw an object,
then light it, then go to the next object. What that means is that the number of draws you have are (numLights * numObjectDraws).
With lighting in a deferred-renderer you draw all the objects, then apply lighting to them all at once. What that means
is that the number of draws you have are (numLights + numObjectDraws). So the efficiency of your rendering increases
linearly instead of exponentially. As you add more and more lights that fact becomes more and more important.
Challenge #1: I knew nothing about deferred rendering
The first challenge was just learning how deferred rendering works, and how it is implemented in other rendering systems. One of the most useful articles I read was by Casey Carlin with Whole Hog Games:
http://www.wholehog-games.com/devblog/2013/06/07/lighting-in-a-2d-game/
I highly recommend reading it, but to summarize it was a great explanation of how deferred rendering works in 2D. The basic methodology involves rendering different representations of objects to multiple output framebuffers, then combining that information in a pass of lighting to output the final rendered view. It looks something like this:
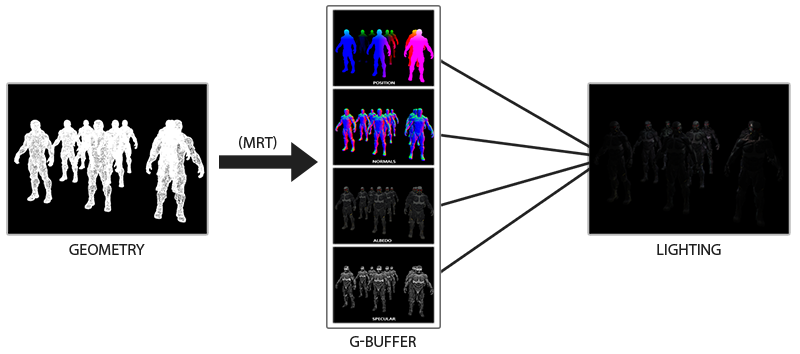
Like you can see in the image above, objects draw themselves to multiple render targets. Each render target holds information about the object. One each for normals, depth, specular, diffuse, self-illumination, and anything else your lighting algorithms will need. This series of framebuffers are often referred to as the G-Buffer. The trick that makes this mechasim performant is the ability to draw to multiple render targets in a single shader simultaneously. The code can look a little like this:
#extension GL_EXT_draw_buffers : require
precision mediump float;
void main() {
    gl_FragData[0] = vec4(1.0, 0.0, 0.0, 1.0);
    gl_FragData[1] = vec4(0.0, 1.0, 0.0, 1.0);
    gl_FragData[2] = vec4(0.0, 0.0, 1.0, 1.0);
    gl_FragData[3] = vec4(1.0, 1.0, 1.0, 1.0);
}
Note the first line of the shader there, #extension GL_EXT_draw_buffers : require. WebGL 1.0 (OpenGL ES 2.0) doesn’t
have support for Multiple Render Targets (MRT). Support for MRT is implemented in WebGL 2.0 (OpenGL ES 3.0), and exposed
in WebGL 1 via the extension shown above. Unfortunately the support penatration for the extension and/or WebGL is really
low. According to WebGL Stats less than 50% of the visitors to the monitored sites have browsers that suport
the GL_EXT_draw_buffers extension. I knew that if I wanted the plugin to have any kind of usage I couldn’t use this
feature. Which brings us to challenge #2.
Challenge #2: WebGL has no MRT support
How do I draw the multiple framebuffers of data that my lighting shaders will need without support for MRTs? The answer is, unfortunately, to draw each of the buffers in sequence as separate passes. To reduce the number of render passes I decided to only use the diffuse and normal buffers. We get a pretty good effect and it only will take 3 passes (diffuse pass, normal pass, lighting pass). In 2D these buffers are sufficient to give some good effects.
Unfortunately this means that for simple applications with only a few lights, the renderer I built will likely be much slower than the normal renderer in pixi. Once you get to a complex application, with many lights, that is when you will see the performance benefits of using this deferred renderer over an implementation in the forward renderer.
Implementation
Alright, that is enough prologue, let’s look at some code. Lets first talk about how we solve the most basic problem preventing efficient deferred rendering: No MRT support in WebGL 1.0 (OpenGL ES 2.0). Like we mentioned before, we have to do a pass per buffer instead of filling all the buffers at once. This means that the more information we want to use, the longer our render cycle will be (significantly) because we have to do multiple shader passes.
So lets talk about how we would build the deferred renderer. Lets start with just 3 passes, one for the diffuse texture, one for the normal texture, and finally a composite pass that applies lighting. So lets create a renderer that extends the built in WebGLRenderer, and has a flag for which pass we are on:
function WebGLDeferredRenderer(width, height, options)
{
    options = options || {};

    // state for if we are in the normal texture pass
    this.renderingNormals = false;

    // call the base constructor
    PIXI.WebGLRenderer.call(this, width, height, options);
}

WebGLDeferredRenderer.prototype = Object.create(PIXI.WebGLRenderer.prototype);
WebGLDeferredRenderer.prototype.constructor = WebGLDeferredRenderer;
Pretty standard.
Next up we need to create the framebuffers that the passes will draw to. The final composite phase will draw to the
screen so it doesn’t need one. But the diffuse and normal passes do. It just so happens that pixi provides an abstraction
for easily using framebuffers called PIXI.RenderTexture. But when do we create these buffers? Well,
the WebGLRenderer has a method for initializing objects when the context is ready. It is called on construction, but also
when the context is restored (if there is a context loss). Lets extend that with our own initialization:
/**
 * Initializes the context and necessary framebuffers.
 */
WebGLDeferredRenderer.prototype._initContext = function ()
{
    // call parent init
    PIXI.WebGLRenderer.prototype._initContext.call(this);

    // first create our render targets.
    this.diffuseTexture = new PIXI.RenderTexture(this, this.width, this.height, null, this.resolution);
    this.normalsTexture = new PIXI.RenderTexture(this, this.width, this.height, null, this.resolution);
};
Awesome, we are rolling now. Pretty simple so far as well! Next up we need to override the .render method to do
our multi-pass rendering instead. Here is where we will render the scene normally to the diffuseTexture and the normal
textures to the normalsTexture:
/**
 * Renders the scene to the screen.
 */
WebGLDeferredRenderer.prototype.render = function (object)
{
    // no point rendering if our context has been blown up!
    if (this.gl.isContextLost())
    {
        return;
    }

    // reset the draw count
    this.drawCount = 0;

    // set the last object rendered
    this._lastObjectRendered = object;

    /////////////
    //  Rendering

    // render diffuse pass
    this.renderingNormals = false;
    this.diffuseTexture.render(object);

    // render normals pass
    this.renderingNormals = true;
    this.normalsTexture.render(object);

    // render lights/composite pass
    this.setRenderTarget(this.renderTarget);
    this.setObjectRenderer(this.plugins.lights);
    this.plugins.lights.flush();
};
And that is about all for the deferred renderer. There is still a few things missing before our renderer works
though. First of all, notice anything kind of magic going on? Anyone familiar with pixi is likely wondering
how the hell setting this.renderingNormals = true; suddenly makes a sprite draw as a normal texture and not
the regular texture everyone is used to. Honestly, I cheated a bit here.
For those unfamiliar with the pixi.js source code, when drawing an object the _renderWebGL method gets called.
Here is what it looks like for PIXI.Sprite:
Sprite.prototype._renderWebGL = function (renderer)
{
    renderer.setObjectRenderer(renderer.plugins.sprite);
    renderer.plugins.sprite.render(this);
};
The magic comes from me patching the PIXI.Sprite.prototype._renderWebGL method with a different one:
PIXI.Sprite.prototype._renderWebGL = function (renderer)
{
    if (!this._originalTexture) {
        this._originalTexture = this._texture;
    }

    // normals render pass
    if (renderer.renderingNormals)
    {
        // if it has no normal texture it is considered "unlit", so skip it
        if (!this.normalTexture)
        {
            return;
        }
        else
        {
            this._texture = this.normalTexture;
        }
    }
    // diffuse render pass, always just draw the texture
    else
    {
        this._texture = this._originalTexture;
    }

    renderer.setObjectRenderer(renderer.plugins.sprite);
    renderer.plugins.sprite.render(this);
};
This new method first checks which pass we are on, normal or diffuse. Then it changes the internal _texture property
to that texture and only then does it call the normal rendering methods. The result of this is that the normal rendering
path is used for sprites which preserves batching and the like for both passes. The downside of this hack is that it
can introduce some really strange behavior. For example, imagine reading sprite.texture after rendering it. You might
be suprised to see it is the normal texture, not the diffuse. Basically, because of this change once you create a sprite
and render it once, the texture cannot be changed like you would expect. There are better ways of doing this instead of
this hack, but for the purposes of a PoC it was fine.
At this point we have a renderer that will do the passes properly, and we have a sprite that will draw the right texture based on which pass we are doing. The only things left are to build the renderer for the lights that outputs the final lit scene, and the different light objects someone would want to put into their scene.
The LightRenderer is pretty simple, and not super relevant to this post so I won’t go through all the code here. But you
can checkout the source for it on GitHub if you wish:
https://github.com/pixijs/pixi-lights/blob/master/src/renderers/LightRenderer.js
The Light objects are bit more complex than what we have gone over so far, but I will try to explain the best I can.
If you are familiar with how the Mesh class works, the lights are pretty similar. In the most basic sense a Light object
is just a container of some geometry, and a shader that describes how to draw that geometry. For example, the PointLight
vertex shader looks something like this:
precision lowp float;

attribute vec2 aVertexPosition;

uniform mat3 translationMatrix;
uniform mat3 projectionMatrix;

void main(void) {
    gl_Position = vec4((projectionMatrix * translationMatrix * vec3(aVertexPosition, 1.0)).xy, 0.0, 1.0);
}
Just a basic pixi vertex shader. The fragment shader is a bit more interesting:
precision lowp float;

uniform sampler2D uSampler;
uniform sampler2D uNormalSampler;

uniform mat3 translationMatrix;

uniform vec2 uViewSize;     // size of the viewport

uniform vec4 uLightColor;   // light color, alpha channel used for intensity.
uniform vec3 uLightFalloff; // light attenuation coefficients (constant, linear, quadratic)
uniform float uLightHeight; // light height above the viewport

uniform float uLightRadius;

void main()
{
    // first calculate the vertex position
    vec2 texCoord = gl_FragCoord.xy / uViewSize;
    texCoord.y = 1.0 - texCoord.y; // FBOs use opposite Y coord system

    // next load the normal texel
    vec4 normalColor = texture2D(uNormalSampler, texCoord);
    normalColor.g = 1.0 - normalColor.g; // FBOs use opposite Y coord system (.g == .y)

    // bail out early when normal has no data
    if (normalColor.a == 0.0) discard;

    // translate the normalize the position of the light to the viewport
    vec2 lightPosition = translationMatrix[2].xy / uViewSize;

    // calculate the directional vector of the light at this texel
    vec3 lightVector = vec3(lightPosition - texCoord, uLightHeight);

    // correct for aspect ratio
    lightVector.x *= uViewSize.x / uViewSize.y;

    ////////////
    // Lambertian Illumination:

    // compute Distance
    float D = length(lightVector);

    // bail out early when pixel outside of light sphere
    if (D > uLightRadius) discard;

    // normalize vectors
    vec3 N = normalize(normalColor.xyz * 2.0 - 1.0);
    vec3 L = normalize(lightVector);

    // pre-multiply light color with intensity
    // then perform "N dot L" to determine our diffuse
    vec3 diffuse = (uLightColor.rgb * uLightColor.a) * max(dot(N, L), 0.0);

    // calculate attenuation
    float attenuation = 1.0 / (uLightFalloff.x + (uLightFalloff.y * D) + (uLightFalloff.z * D * D));

    // calculate final intesity and color, then combine
    vec3 intensity = diffuse * attenuation;
    vec4 diffuseColor = texture2D(uSampler, texCoord);
    vec3 finalColor = diffuseColor.rgb * intensity;

    gl_FragColor = vec4(finalColor, diffuseColor.a);
}
I tried to heavily comment the source here so that it should be easier to follow. he basic idea is that it will color
the lit pixels based on their distance from the light source and other factors liek falloff of the light, etc. It also
takes into account the normal data to give a “shadowed” effect. The purpose of a normal texture is to tell the shader
what the contours of an object are so that it can light it properly. The LightRenderers job is to run the shader for
each light in the scene to create the final lit scene.
The Future
For this plugin to be something that makes sense to use in “real projects” it needs to have robust support for
self-illuminating objects, and potentially specular mapping. In order to do those things I will need MRT support.
This likely means rewritting the plugin to only work on browsers with either GL_EXT_draw_buffers or WebGL 2
support. When I write v2 of this plugin it will likely have those restrictions, and worked best for packaged apps
and other controlled environments.
There are also a lot of things this renderer doesn’t support:
- anything other than PIXI.Sprite
- unlit objects
- emissive objects
- z-position of objects
- casting shadows
There’s more, this was just an experiment on how it could be done and learning experience for me. I hope if you read this far that you also learned something!